Headless Drupal 8 – Retrieving Content Using Backbone.js

In this post I’ll explain how to decouple Drupal front-end to use your own implementation using Backbone.js and Drupal 8 as a RESTful API to retrieve the content. This is what we call a Headless Drupal. Drupal 8 front-end is going to be really attractive to front-end developers because it’s using Twig template engine and because its templates have been cleaned of divitis (an interminable bunch of nested divs). Despite this, there will be some cases where you will need to use your own front-end implementation in any framework, and request the content stored in your back-end application.

So let’s start installing Drupal 8

The fastest and easiest way to do it is to use Bitnami installers. You only need to select your platform and be sure that you download the Drupal 8 version of the installer. bitnami-installer Once you have downloaded the installer, just run it and follow the installation instructions. You only have to remember the user and password to login into Drupal. In my case I used user as username and password as password 😛 bitnami-install The installer will take a few minutes to finish (a little bit more in Windows operating systems). Once it’s finished you should launch the Bitnami Drupal stack so you will see the following web page: bitnami-start Now you can click Access Bitnami Drupal Stack link to access to your Drupal website. Just fill the login form using the username and password you previously entered when installing the Bitnami stack. drupal-login 
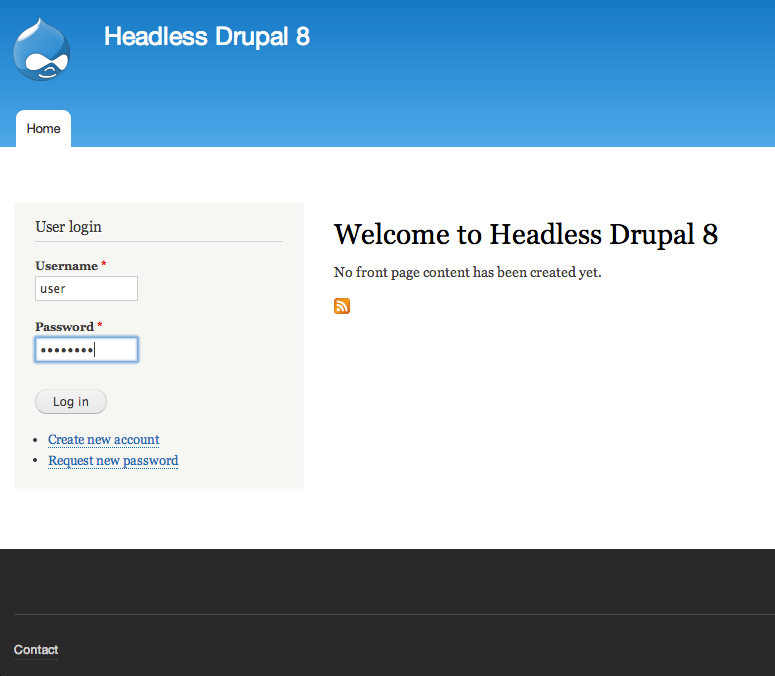
Now we need to add some content and try accessing it using a REST callback. So, let’s start creating new content by clicking the Add content link. add-content 
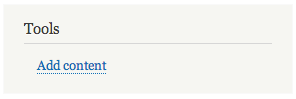
Select Basic page to create a basic content type with title and body. Currently there is not a way to request images or other fields through REST in Drupal 8. It is in the works however. basic-page Fill title and body fields and press Save and publish button when done. create-basic-page 
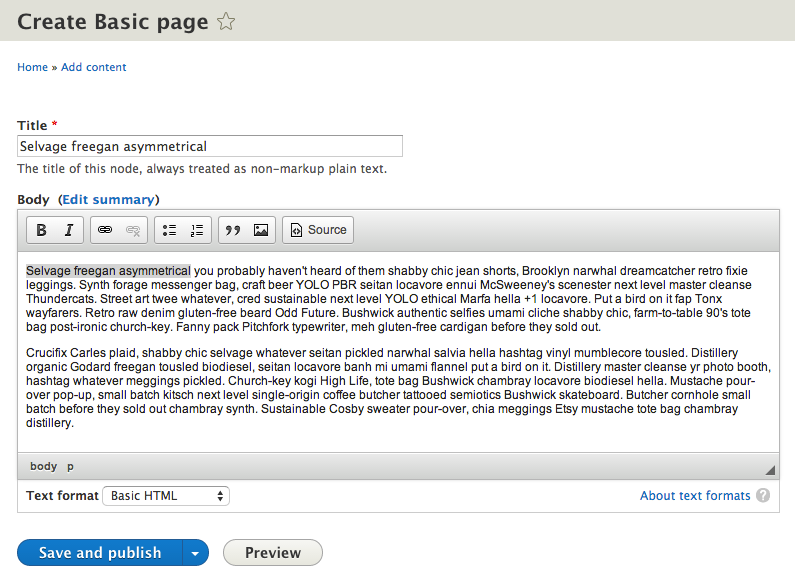
Repeat the same process to create a few content pages in order to have some data to request later. Once you have four or five basic pages press Structure in the top menu and then press Views option. views A view in Drupal is a list of content where you can add and remove fields, filters and select your desired sort ordering. It’s really handy to create complex pages of content. In this case we are going to create a simple page that lists all our already created basic pages. So start pressing the Add new view button. add-new-view Fill the view create form with the settings shown in the following screenshot: view-create
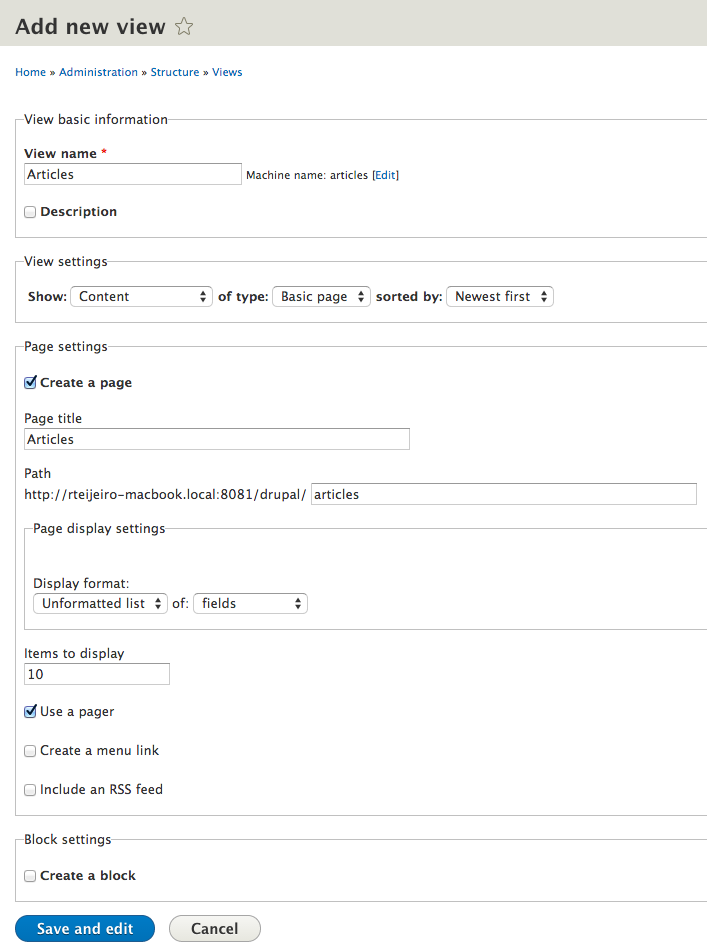
Now you have a default listing of basic pages that shows only the title field. We also want to show body field, so let’s add it. Press Add button in the Fields section. view-fields Now select Body field from the popup window. You can find it easily using the search box, as you can see in this screenshot: field-body Be careful not to select Body (body language) field. Once you have found Body field, check the checkbox and press Apply (all displays) button. Continue with default values pressing the apply button. Now you should have a view like this one: view-save 
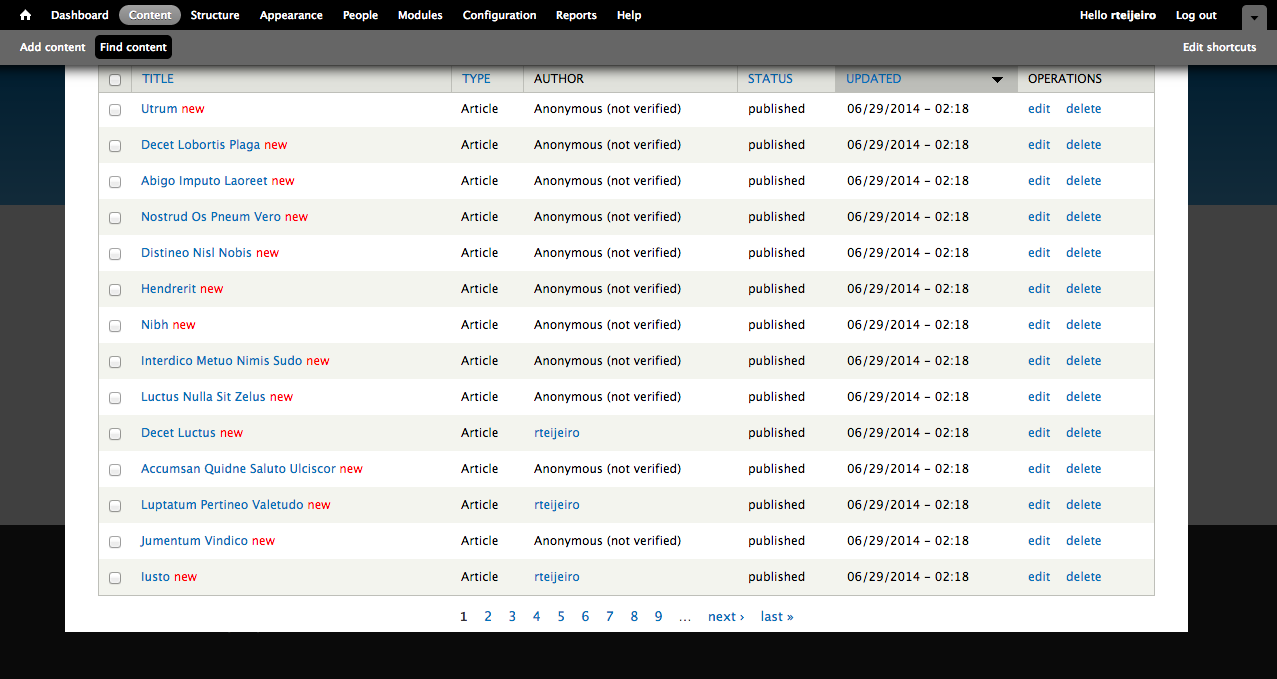
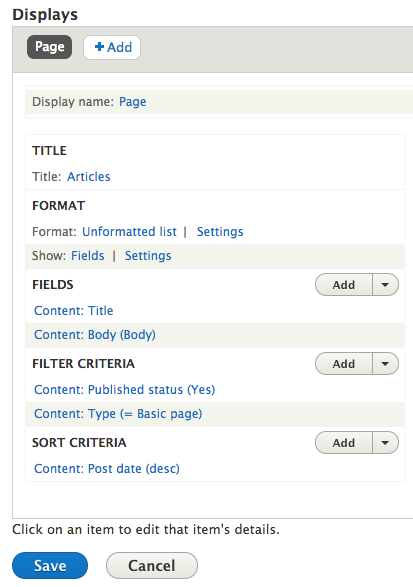
You can take a look at the results by pressing the Save button and browsing to the selected URL – in this case articles. So if you visit http://localhost/drupal/articles you will see a page that lists all the basic pages you already created, with title and body fields: articles-page 
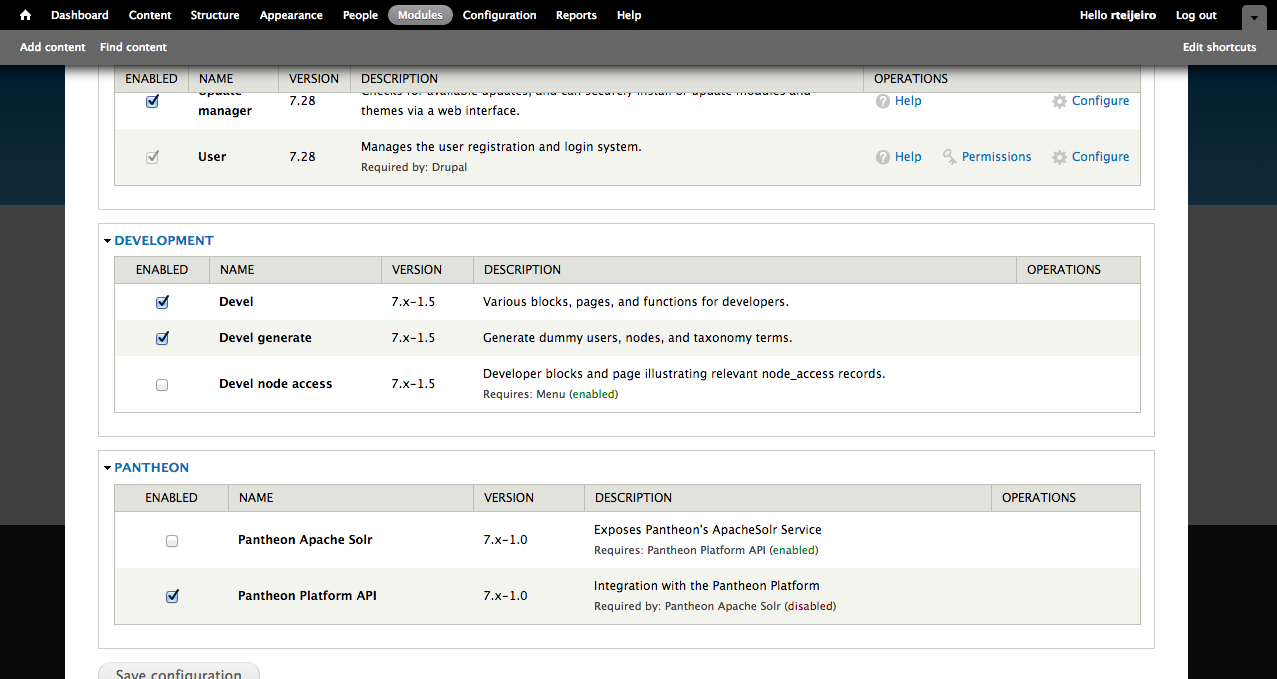
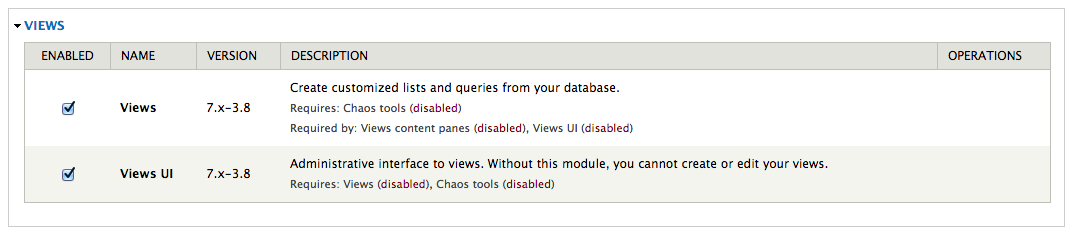
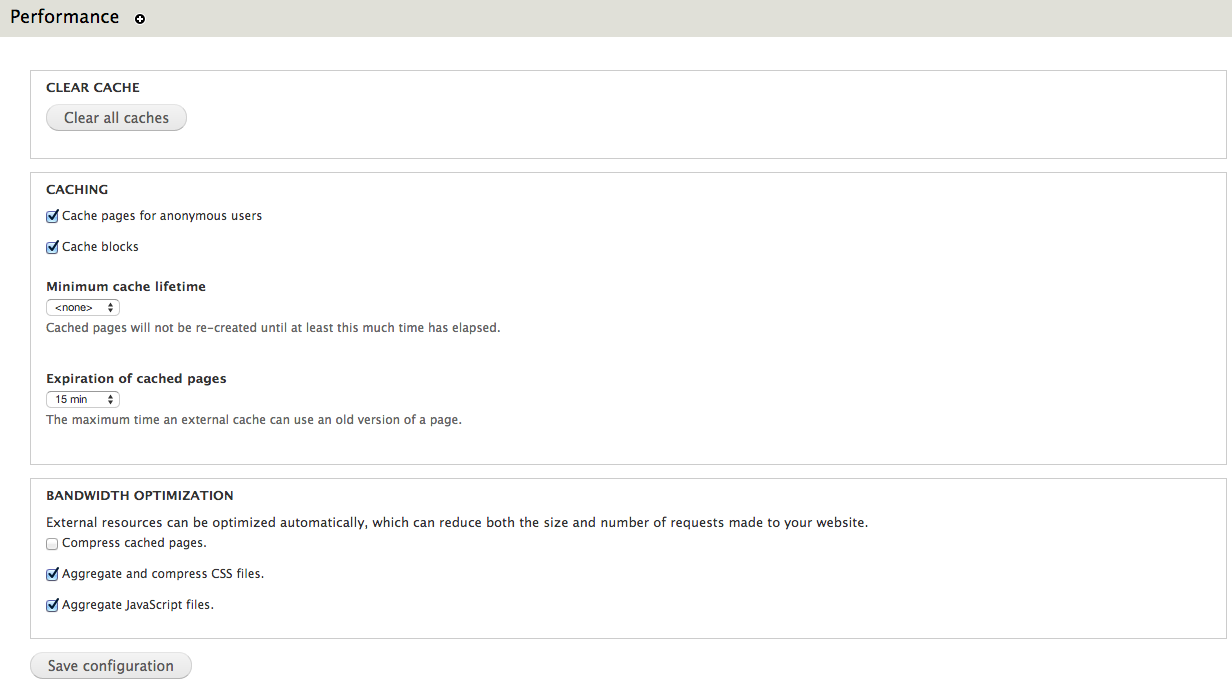
Now it’s time to enable Web Services modules in Drupal to have access to this content through REST requests. Just click Extend button in the administration bar at the top. Find and enable the modules at the end of the page and press Save configuration button. enable-ws-modules 
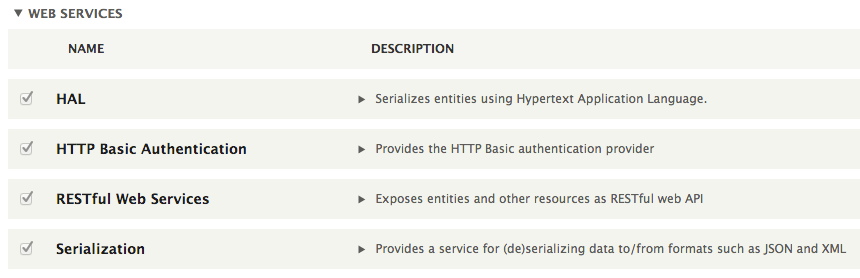
You will also need to configure Drupal permissions to allow REST requests. It can be done in People option in the top administration bar and by selecting the Permissions tab. Configure the permissions to allow read requests for every user and write requests to only authenticated users, as you can see in the following screenshot: rest-permissions You should now have access to the Drupal content you have created in JSON format using a GET request with CURL command, for example:

curl -i -H "Accept: application/json" http://path-to-your-localhost/drupal/node/1

The result, your Drupal node in JSON format, should look something like this:

node-json-output

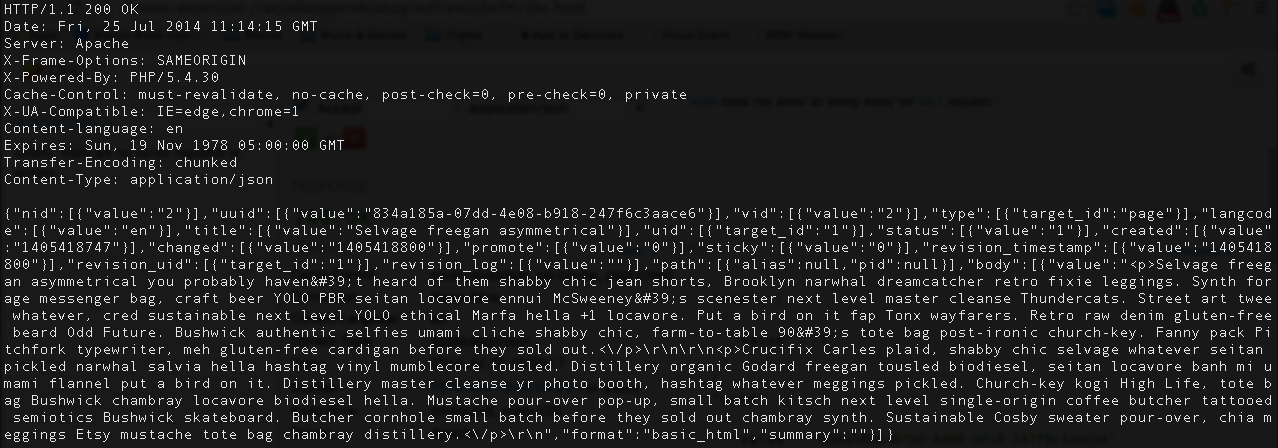
You can try to access the rest of your content using the same way with CURL command or any tool like Dev HTTP Client.

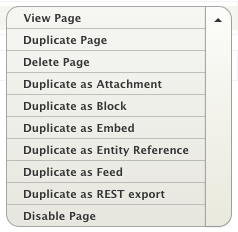
If we want to access the page with the list of contents we previously created using Views, we will have to clone it. Just visit your view configuration page again and press Duplicate as REST export button in the dropdown menu on the right.

duplicate-rest

Now we need to change the access Path to avoid conflicts with the other page. You can do it by pressing the path link in Path Settings section, as you can see in the following screenshot:

rest-path

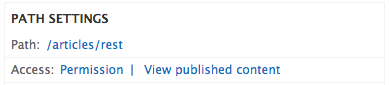
If you save the view and try to access the path you have configured, using CURL command, you will get the page content in JSON format.

curl -i -H "Accept: application/json" http://path-to-your-localhost/drupal/articles/rest

You will see a lot of information related to Drupal nodes like changed and created dates , node status and node id. This is useful information if you really need it but it can considerably increase the amount of data transferred – an aspect that’s really important when you accessing it using a mobile device.

Let’s configure the view to provide only the data we really need, like content title and body, for example. You can start by simply changing the format from Entity to Fields and select only the fields you want. Just press Entity link in Format section on your view settings page.

rest-format

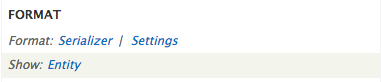
Now change the format to Fields, press save and select Raw format for all fields, to avoid Drupal adding unnecessary field formatting.

rest-fields

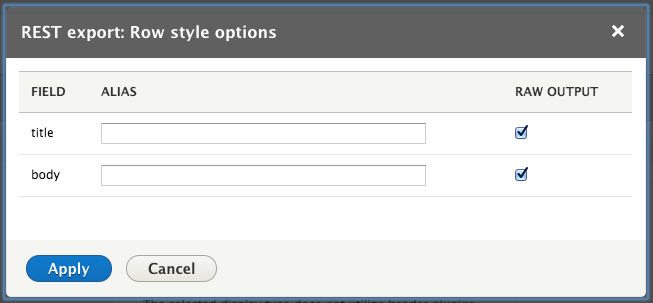
If your save these changes you can see that the JSON response contains only the data we want, which saves a lot time and data transfer.

rest-view-json

It’s time to access and display the data properly using an external application, in our case a simple Backbone.js application that makes the REST requests to Drupal, gets the data in JSON format and displays it using a template.

Let’s start creating a folder for our application using the same web server provided by Bitnami.

Locate the folder where you have installed the Bitnami Drupal stack and create a folder named app using the following command:

mkdir /path-to-bitnami-drupal-stack/drupal-8.0.alpha13-0/apps/drupal/htdocs/app

We are going to place all Backbone.js application files inside this folder so consider it for the following code examples. You can find the whole application code in the following github repository:

https://github.com/rteijeiro/headless-drupal8/tree/v.0.1

First we need to create a index.html file where we are going to load the latest Backbone.js, Underscore.js and jQuery libraries using the following code:

<script src="http://code.jquery.com/jquery-2.1.1.min.js" type="text/javascript"></script>
<script src="http://underscorejs.org/underscore-min.js" type="text/javascript"></script>
<script src="http://backbonejs.org/backbone-min.js" type="text/javascript"></script>

The order in which you load the libraries is really important, so take it into consideration.

Now you need to create your Backbone.js application file. We are going to call it app.js and you have to load it the same way you have loaded previous libraries:

<script src="app.js" type="text/javascript"></script>

The Backbone.js application structure consist in the following classes:

var Article = Backbone.Model.extend({
  title: '',
  body: ''
});

The model describes the data structure, in this case the Drupal article structure that consist of title and body fields.

var Articles = Backbone.Collection.extend({
  model: Article,
  url: 'http://path-to-your-localhost/drupal/articles/rest'
});

The collection is a group of model items fetched from the given URL, that points to your previously configured REST view.

var ArticleView = Backbone.View.extend({
  tagName: 'li',
  template: _.template($('#article-view').html()),
  render: function() {
    this.$el.html(this.template(this.model.toJSON()));
    return this;
  }
});

We define a view to display single articles using it’s own template that should be placed in index.html file, as you can see in the following snippet:

<script type="text/template" id="article-view">
  <h2><%= title %></h2>
  <%= body %>
</script>

We also define a view to display the list of articles using the previous view as a subview. This view should fetch the data through a GET request explicitly called using the fetch function. This is not the best way, but I will describe in my next blog post how to do it using routers. In the next post, I will also demonstrate how to create and delete articles using POST requests. In the meantime, I suggest you test the code samples and try different template implementations, adding more fields to the view. Questions or comments? Post them below or Tweet them to me @rteijeiro See you in the next post 😉

Performance & Scalability Test: Pantheon -VS- Other Drupal-Based Platforms

In this post I will demonstrate how to  setup a Drupal 7 site from scratch using Pantheon. Then, using Load Impact, I will attempt to compare the performance of Pantheon versus other Drupal-based platforms (Aberdeen Cloud platform and VPS).

Pantheon

For those who don’t know Pantheon, it’s a cloud platform for web development using different frameworks such as Drupal or WordPress. It provides development, testing and live environments for easy deployment using git. And since it’s built using containers instead of virtual machines, it’s performance and scalability is considerably better than traditional hosting providers.

Pantheon-howItWorks copy

Pantheon also provides a platform with preconfigured tools such as Varnish, Redis, Apache Solr, automated backups and application updates, etc.

For this performance test, we are going to need to create a Pantheon user account.

As a registered Pantheon user, we now see the Pantheon control panel:

1-your-sites

Now we need to create a site in order to install Drupal and run a performance test.

Steps to creating a Drupal 7 site using Pantheon

1. After registering an account with Pantheon, click “Create a site now” link.

2-account-ready

2. Next, provide some information about the site, such as the name and the access URL. Later, you can easily redirect your existing domain if you need it.

Press the “Create Site” button to continue with the process.

3-create-site


3. Create or import a site

You can create a site from scratch using one of the available web application cores for Drupal or WordPress, or you can import an existing one – packing your application files and database dump.

For this test, we are going to start a Drupal 7 site from scratch, but feel free to import your existing application if you want to compare its performance in Pantheon.

Select “Start from scratch” option and one of the available cores – in this case Drupal 7.

Press “Install Drupal 7” button to continue with the site installation.

Pantheon will setup the site with the best suitable configuration for Drupal 7.

6-create-drupal-site


4. Use the dashboard and configure your application

Once the site is completely installed you will have access to the site Dashboard where you can configure different aspects of your application, create backups and use the Pantheon tools.

10-dashboard

Now it’s time to install Drupal. As you can see, the site installer only copied Drupal 7 files but it didn’t execute Drupal installation.

You have to do it manually, so just press “Visit Development Site” button.

11-visit-development-site

5. Install Drupal

In this case, you are going to install Drupal 7 using a Pantheon profile – a custom Drupal distribution preconfigured with Pantheon modules and custom configuration that enables Drupal caching and provides better performance, and an Apache Solr integration.

Press “Save and continue” button to go to next installation step where you can select default language for Drupal. You can install Drupal 7 in other languages – but that can be done later.

Press “Save and continue” button again and Drupal will install with pre-selected Pantheon configuration.

After the installation you have to configure site details, such as site name or administrator username, password and email.

Once you’ve completed the form details, Drupal should be installed and ready to use.

12-drupal-choose-profile


6. Start using Drupal

To start using Drupal just press “Visit your new site” link and you will access your brand new Drupal 7 website.

7.  Setup your git repository in your local machine

Now it’s time to set up your git repository in your local machine so you can add or modify your Drupal website.

First of all, you need to add your SSH public key into your Pantheon user account. Just go to “Sites & Account” in your user menu.

18-sites-account

If you don’t already have a SSH key you have to create it. You can find more information about SSH key generation here: http://helpdesk.getpantheon.com/customer/portal/articles/366938-generate-ssh-keys

Once you have created your SSH key, you should add your Public Key just by pressing the “Add key” button. For more information about SSH keys, visit this page: http://helpdesk.getpantheon.com/customer/portal/articles/361246-loading-ssh-keys

Now you can connect to Pantheon git repository using SSH.

8. Configure the repository in your local machine

To configure the repository in your local machine you should have git previously configured. If you need to install git just follow this guide for all platforms https://help.github.com/articles/set-up-git

First you should copy the path to connect to your server using SSH, because you are going to need it later. You can find it in your project dashboard.

20-dashboard

We are going to use Git as connection mode so be sure that it’s selected and copy the URL you find in the textbox. As you can see in the following screenshot:

21-connection-mode

Go to your terminal and execute the following command from the location where you want to create your project repository folder (Don’t forget to use the URL you previously copied):

$ git clone ssh://codeserver.dev.xxx@codeserver.dev.xxx.drush.in:2222/~/repository.git drupal-loadimpact

If everything goes well, the command will create a folder named drupal-loadimpact with all the files corresponding to Drupal 7 core.

9. Install devel module

Now we are going to install devel module. This Drupal module will help us to creat thousands of nodes in our Drupal website.

A node is a Drupal piece of content with multiple fields and properties, and we are going to use them for our performance test.

You can download the module using wget or drush, but remember to place the module files into sites/all/modules directory in your repository folder.

Then add the new files for commit using the following command:

$ git add sites/all/modules/devel

Commit the changes into your local repository using a descriptive message:

$ git commit -m"Added devel module."

And finally push the changes to the remote repository:

$ git push origin master

You can check that everything went well by checking the commit log in your project dashboard.

22-devel-module-commit

You can see the new commit with your descriptive message.

10.  Install devel module by enabling it in Drupal

Select “Modules” menu option from the top menu in your Drupal site.

Enable only Devel and Devel generate modules.

23-drupal-modules


11. Generate content 

Now select “Configuration” menu option from the top menu. And then select “Generate content” option.

25-devel-menu


In this example, we are going to create 5000 nodes of type Article for our performance test. It should be enough to have a high amount of content in the Drupal database and create different performance tests.

27-devel-generate-content

Press “Generate” button and relax because it’s going to take a while. You can take a cup of coffee 😉

…. (coffee break)

So, here you have your 5000 recently created articles. To see them just select “Content” from the top menu.

29-drupal-content

12. Create page listing all content (for performance testing purposes)

Now we are going to create a page that will list all the content so it will create a high amount of database queries and render a lot information in the page.

For that we will need Views (https://www.drupal.org/project/views) and Chaos Tools Suite (https://www.drupal.org/project/ctools) modules.

You can download them using the same method you used to download Devel module. Don’t forget to place them in sites/all/modules folder to let Drupal to find them and be able to install them.

Once you have downloaded the modules into your local repository, you can add and commit the modules into your local repository as we did before:

$ git add sites/all/modules/views
$ git commit -m”Added views module.”
$ git add sites/all/modules/ctools
$ git commit -m"Added ctools module."

Now push the changes to your remote repository:

$ git push origin master

Once again, you can see your commits in the Commit Log in your project dashboard and verify that everything went well.

To enable the modules, select “Modules” option in your top menu:

Enable Chaos tools module because it’s a dependency of Views module:

32-chaos-tools

Also enable Views and Views UI modules:

33-views-module-enable

Now select “Structure” option form the top menu to start creating your view page.

Then select “Views” option.

On this page you can find a list of preconfigured views. We are going to create our own view page with a list of a specific number of content articles.

35-views-list


13. Create and configure a new View

Select “Add new view” link to start.

Create a new view using the following configuration and press “Continue & edit” button.

37-views-create

This page is the configuration panel for your view. You can add fields, sorting order and filters as well as arguments and other custom features.

38-views-add-fields

We are going to add a few fields to display more content in the page.

Now you can see that there is only Title field available. Press the “Add” button in “Fields” section.

In the next window select Body and Image fields and press “Apply (all displays)” button with default settings for all fields.

40-views-select-fields

Now your “Fields” section should contain the following:

  • Content: Title
  • Content: Body(body)
  • Content: Image(image)

Press “Save” button to save your new view.

14. Visit your new page

Now you should be able to visit your page. The page we created for testing is here: http://dev-drupal-loadimpact.gotpantheon.com/performance-test

You should see a page with 100 article nodes –  which is a normal amount of data for Drupal to load.

It will create a considerable number of database queries and processes to render all the content into the page.

Consider to increase or decrease the number of items in the “Pager” section of your view if you want to test with different amount of data loaded.

You can select different values to adapt the performance test to your real needs.

43-views-pager-config


We have to take into consideration the default configuration that Pantheon profile applies to Drupal.

If you select “Configuration” in the top menu you can find “Performance” menu item:

44-performance-link

In this page you can find configuration settings related to Drupal performance. You can see that there are a few settings already enabled.

Page and block caches are enabled for 15 minutes. Also, CSS and JavaScript are aggregation is enable – what packs all CSS and JavaScript files and build them together in order to decrease the number of requests to the server to download all the files.

45-performance

It’s important to clear caches every time you run a new performance test to be sure that you don’t have cached pages. Just press “Clear all caches” button.

Testing the performance of Drupal-based platforms

Now it’s time for performance testing using Load Impact. Create a user account if you don’t already have one.

After that visit “My tests” to start creating your performance test and press “Start a new test” button. This will execute a rather small test of 50 concurrent users for 5 minutes.

47-my-tests

Type your test page URL into the text box and press “Start test” button.

You can also configure a larger test from the “Test configurations” page (e.g. with ramp-up/down; additional IPs, multi-geo load generation; mobile network emulation, server metrics, etc.)

48-start-test

The test will start and you will see how Load Impact is creating requests from different hosts.

50-test-running


Pantheon results

The following are the performance test results for the same Drupal site (using the same configuration and number of content nodes) hosted in Pantheon and Aberdeen Cloud platforms and a Virtual Private Server:

51-pantheon-test

Pantheon results (user load time)

Aberdeen Cloud 

52-aberdeencloud-test

Aberdeen Cloud results (user load time)

VPS (CPU: 1.5 Ghz. – RAM: 1 Gb.)

53-VPS-test

VPS results (user load time)


You can observe that Pantheon keeps user load time between 1.5 and 3 seconds, meanwhile with Aberdeen Cloud platform and the VPS, the user load time stays between 3 and 4 seconds.

Based solely on these few simple load tests, it seems Pantheon manages to serve Drupal pages at least one second faster than the other tested platforms. 

Now it’s time for you to try different configurations for the Drupal site, like number of content nodes, disable caching or file aggregation and see how it affects performance and scalability.

Read more about load and performance testing with Pantheon: http://helpdesk.getpantheon.com/customer/portal/articles/690128-load-and-performance-testing

——–

This blog post was written by Ruben Teijero. Follow the Load Impact blog (see below) for more great articles by Ruben and many other fantastic developers, testers and operations pros.

5 Ways to Better Leverage a DevOps Mindset in Your Organization

The last few years have given rise to the “DevOps” methodology within many organizations both large and small. While definitions vary somewhat, it boils down to this: breaking down silos between developers and operations.

This seems like a common sense approach to running a business, right?

While many organizations do have a DevOps mindset, I find myself regularly talking to IT staff where there is near zero collaboration between applications teams, network and security. In highly silo-ed organizations these teams can actually work against each other and foster significant animosity. Not my idea of an efficient and agile organization!

Organizations that use a DevOps mindset will deploy applications and capabilities significantly faster and with fewer operational issues from what the industry is reporting.  According to Puppet Labs:

High performing organizations deploy code 30 times more often, and 8000 times faster than their peers, deploying multiple times a day, versus an average of once a month.

It is extremely important that applications teams are creating code and applications in a way that can be properly supported, managed and operationalized by the business. Here are some tips to best leverage this type of approach in any organization:

1. It’s not (entirely) about tools

Everyone loves to buy new technology and tools.  The problem is that often times products are only partially deployed, and capabilities go unused and sit on the shelf. And if you think starting to use some new products and tools will make your organization DevOps enabled, think again.

Building a DevOps culture is much more about taking two parts of the organization whose roots are quite different and bringing them together with a shared vision and goal. Think about it: operations looks at change as the reason the last downtime occurred and App-Dev is constantly trying to evolve and elicit disruptive change. No product or tool is going to make this all happen for you. So start with this in mind.

2. Communication and goals are absolutely critical

This is going to sound really obvious and boring, but if your ops and apps teams are not communicating – not working towards a shared set of goals – everyone is vested if you have a problem.

Defining what the organizational goals are in terms of real concrete objectives that meet the SMART criteria is the right place to start.  I’ll bet most organizations do not have goals that meet this level of specificity so I’ll provide a good and bad example:

  • Bad goal: “We want to be the leader in mobile code management”
  • Good goal: “We will be the leader in mobile code management by June 30th of 2015 as measured by Garnter’s magic quadrant, with revenues exceeding $25m in 2Q 2015″

See the difference?  Even the casual observer (who doesn’t even know what this fictitious space of mobile code management is) could tell if you met the second goal. Great. Now that we have a real concrete goal the organization can put an action plan in place to achieve those goals.

Communication can be a real challenge when teams have different reporting structures and are in different physical locations.  Even if folks are in the same building it’s really important for face to face, human interaction. It’s certainly easier to send an email or text but nothing beats in-person interaction with a regular cadence. Collaboration tools will certainly come into play as well – likely what you already have in place but there are new DevOps communications tools coming to market as well.  But first start with team meetings and breaking down barriers.

3. Practice makes perfect: continuous integration, testing and monitoring

DevOps is about short-circuiting traditional feedback control mechanisms to speed up all aspects of an application roll-out.  This means exactly the opposite of what we typically see in many large software programs and has been particularly acute within large government programs, or at least more visible.

Striving for perfection is certainly a worthy goal, but we should really be striving for better.  This means along the way risks will need to be taken, failures will happen and course corrections put in place.  It is important to realize that this whole DevOps change will be uncomfortable at first, but taking the initial steps and perfecting those steps will help build momentum behind the initiative.

Instead of trying to do every possible piece of DevOps all at once, start with one component such as GIT and learn how to really manage versioning well.Then start working with cookbooks and even use Chef to deploy Jenkins, cool eh?

It’s probably also worth noting that training and even hiring new talent could be a key driving factor in how quickly you implement this methodology.

4. Having the right tools helps

Like I said earlier, everyone loves new tools.. I love new tools!  Since this whole DevOps movement is quite new you should realize that the marketplace is evolving rapidly. What is hot and useful today could not be what you thought you needed tomorrow.

If you already have strong relationships with certain vendors and VAR partners this would be a great time to leverage their expertise in this area (assuming they have it) to look at where gaps exist and where the quick wins are.  If platform automation and consistency of configuration is the right place for the organization to start then going with Chef or Puppet could make sense.

I think the important factors here are:

      • What are your requirements?
      • What do you have budget do acquire and manage?
      • Do you have partners who can help you with requirements and matching up different vendors or service offerings?

Since this could easily turn into a whole series of blog posts on DevOps tools, I’m not going to go through all the different products out there. But if you can quickly answer the questions above, then get moving and don’t allow the DevOps journey to stall at this phase.

If it’s difficult to figure out exactly what requirements are important or you don’t have good partners to work with, then go partner with some of the best out there or copy what they are doing.

5. Security at the pace of DevOps

What about security? Building in security as part of the development process is critical to ensuring fatal flaws do not permeate a development program. Unfortunately, often times this is an afterthought.

Security hasn’t kept pace with software development by any metric so taking a fresh look at techniques and tools has to be done.

Static analysis tools and scanners aren’t terribly effective anymore (if they were to begin with). According to Contrast Security’s CTO and Founder, Jeff Williams, we should be driving towards continuous application security (aka. Rugged DevOps):

“Traditional application security works like waterfall software development – you perform a full security review at each stage before proceeding. That’s just incompatible with modern software development. Continuous application security (also known as Rugged DevOps) is an emerging practice that revolves around using automation and creating tests that verify security in real time as software is built, integrated, and operated. Not only does this eliminate traditional appsec bottlenecks, but it also enables projects to innovate more easily with confidence that they didn’t introduce a devastating vulnerability.”  – Jeff Williams

While DevOps is all about streamlining IT and bringing new applications to market faster, if you don’t ensure that the application can perform under a realistic load in a way real world users interact, there will be problems.

Likewise if an application is rolled out with security flaws that are overlooked or ignored, it could be game over for not only the business but quite possibly the CEO as well. Just look to Target as a very recent example.

It is clear that an integrated approach to developing applications is valuable to organizations, but if you don’t look at the whole picture – operational issues, performance under load and security, you could find out that DevOps was a fast track to disaster. And obviously no one wants that.


—————

Peter CannellThis post was written by Peter Cannell. Peter has been a sales and engineering professional in the IT industry for over 15 years. His experience spans multiple disciplines including Networking, Security, Virtualization and Applications. He enjoys writing about technology and offering a practical perspective to new technologies and how they can be deployed. Follow Peter on his blog or connect with him on Linkedin.

About Load Impact

Load Impact is the leading cloud-based load testing software trusted by over 123,000 website, mobile app and API developers worldwide.

Companies like JWT, NASDAQ, The European Space Agency and ServiceNow have used Load Impact to detect, predict, and analyze performance problems.
 
Load Impact requires no download or installation, is completely free to try, and users can start a test with just one click.
 
Test your website, app or API at loadimpact.com

Enter your email address to follow this blog and receive notifications of new posts by email.